Last week, Tracy Rosen and I facilitated a very different (and fun!) type of workshop at the AQIFGA 2016 adult education conference in Longueuil, Quebec. Our workshop was all about introducing adult education teachers to the station rotation model and blended learning.
What are stations?
Teaching with stations is not a new or revolutionary concept. It’s actually a common classroom practice used by teachers in the youth sector. There are many different models for setting up stations but the basic gist is that students rotate through different “learning stations” during a class.
So what did it look like in our workshop? We moved desks around to divide the classroom into 4 station areas. The participants were asked to rotate through the stations in 15 minute intervals. The topic “how to teach with stations” was the same at each station, but we provided different ways to learn about the topic.

The video station: This station featured four short videos about stations, that Tracy had created in advance. We left a bunch of iPads on the table but participants were free to use their own devices too. As Tracy and I were busy at the teacher station, we needed things to run smoothly without our help. We taped paper instructions to the desks that provided links to the videos and reminded to people to wear headphones, as not to bother the other tables.

The reading station: The reading station gave teachers a choice between two paper articles to read. After reading the article(s), the teachers were provided with written instructions to interview their peers with guiding questions.

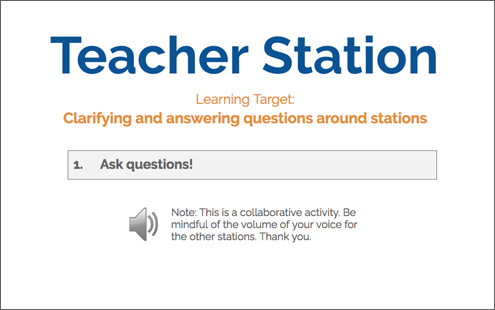
The teacher station: We really wanted to model what this would look like in a typical classroom where you don’t have the luxury of a co-presenter to “put out fires” or solve problems at the other stations. We didn’t prepare much for the teacher station in advance, we just answered questions as they came up. That’s a major bonus in terms of prep time. We initially had lots of participant questions about the concept of stations, but as the workshop progressed and participants began rotating through the stations, we found ourselves spending our time clarifying topics that came up at the other stations.

We provided simple and straightforward instruction sheets at ALL of the stations so that Tracy and I could focus on working at the teacher station. Here’s an example of one of the instruction sheets that we taped to the tables:
The extension station: This was a “extra” station that we put into place where participants could pursue self-directed learning. It was NOT part of the regular 15 minute rotations. The purpose for this station was to model what happened if students finished early at one of the other stations. Participants were free to pursue additional online resources that we had gathered before the workshop, or work on creating a model for their own classroom.

.. and we used a simple Google Timer on the classroom SMARTBoard to keep the participants moving through the stations.

OK. So what about Blended Learning, where did that come in?
In a nutshell, blended learning is about mixing online resources within a traditional brick-and-mortar classroom. This is what we aimed to do with our video and extension stations. Students are also often provided with a bit more control in terms of their path, pace (and sometimes place) when learning a new topic. If this sounds familiar, it might be because you’ve already heard of a flipped classroom. The Flipped Classroom is a form of blended learning. The essence of a flipped classroom is about making lectures available to your students as videos so that the teacher can use the time in class to work with students. The reality in adult education? The Flipped Classroom (just by itself) is a little harder to do because we don’t typically give homework in adult education.. so most learning has to happen in the classroom. Another obstacle is finding a time for students to watch videos during class. Stations can provide this organized structure for students to watch videos in the classroom.
Here are a few more things that I love about stations:
- Easy to start: You could start using stations by simply rearranging the desks in your classroom (a station for reading, research, teacher feedback, etc) – nothing really fancy
- Differentiation: Each station could be used to tackle the same learning objective but with a different approach (i.e. – read about adjectives, watch a video about adjectives, write a paragraph with adjectives, have a discussion with peers about adjectives, talk to the teacher about adjectives)
- Less is more: No fancy apps or websites are required. Students can use classroom computers or even use their own devices to watch videos or create a product.
- Amplify the teacher: The teacher station allows you to focus on SMALL groups of students. This allows you to develop a more personal connection and react accordingly to their individual needs.
- Movement: Moving throughout stations can break up the monotony of sitting all day at one desk.
- Develop student autonomy: As the teacher is always at the teacher station, you’ll need to remind the students to “ask three before me” or “demande a trois avant moi” when working in a classroom with stations. This also encourages more peer collaboration.
Concerns that were brought forward during the workshop:
Q: Do the students need to start at the teacher station?
A: No. The first group rotation at the teacher station may be about getting the students started (assessing prior knowledge) while later rotations might be about answering questions that come up in the other stations (clarifying information).
Q: Do I need to do a whole-class lecture before I start?
A: Tracy and I felt that giving a big lecture doesn’t necessarily mean everyone will listen. Often the students get into the stations and ask “Hey! What are we supposed to do now?” So, we jumped right in asked our participants to start at a station. They stayed with their group for the remainder of the workshop.
Q: How do I make the groups?
A: Ideally, you could group students according to ability. In our workshop, we just asked people to limit themselves to 10 people per station and to choose a station to start at.

Q: Would I do stations every class?
A: Not necessarily. It could be something you do once a week, i.e. – on a Thursday. The rest of the week would be your regular class. It’s up to you!
Q: Will it noisy/messy?
A: Absolutely. However, it gets better over time. We even noticed that the volume went down as our workshop progressed. We initially asked all the groups to keep their voices at a whisper but sometimes people got excited and forgot. That being said, once each group experienced what it was like at certain stations with the higher noise levels, they were more mindful of the volume of their voice when they moved on. This is a normal part of the process.
Q: What do the students ACTUALLY do at each station? What do I do about multi-level students?
A: If you take a look at slide 27 in our presentation, we show an example of a choice board. You could also ask student to reach a set number of objectives by the end of the week, as seen on slide 28.

Q: Do I need to make videos?
A: While I love the idea of the video station, you don’t absolutely need to have one. There are many different ways to setup stations and this ultimately comes down to each teacher’s needs. The same goes for the number of stations.
Q: How do we make videos?
A: You can use an app like Explain Everything (see my tutorial) or even the video camera on your phone. You could use tools like PowToon or whatever you like. One word of advice: Whatever you do, keep your videos SHORT and SIMPLE or making videos will bog you down. Trust me on this!
Q: Where do I put the videos?
A: Tracy placed her videos on YouTube and then created a playlist. If this sounds above your comfort level (or too much of a time commitment) then remember you don’t absolutely need to a video station. You could also create YouTube playlists of other people’s videos around a particular topic.

Q: Do you have any other tips for creating videos? Making videos is really not my thing!
A: One idea could be for your advanced students to create videos around a particular topic. It gives the advanced students something to do and more importantly, makes them into valuable contributors. Students working on videos for the class could even be an extension station! Give these students pedagogical feedback in the teacher station until the video meets your standards.
Q: What about resources? Is anyone else actually doing this in Quebec Adult Education?
A: Emilie Bowles (Nova, NFSB) has been experimenting with the use of stations in her adult education history class. Here’s a playlist of videos that includes why she started using stations and what it looks like in her classroom. Some of the FGA English School Board ped. consultants have also recently begun using stations for teacher PD days and at provincial PD events. In addition, I recently discovered that a few teachers at the ACCESS Queen (RSB) campus are starting to experiment with stations too!
Tracy and I would be thrilled to work with any teachers, consultants, or directors in FGA that would like to explore stations. Drop either one of us a line! Last but not least, be sure to read Tracy’s blog post about our stations workshop at AQIFGA and other workshops she attended too. You can also see our AQIFGA presentation + resources at: http://bit.ly/stationsfga